
This guide will walk you through two simple ways to set up Bulma, with zero stress. No prior experience with build tools is required. Let’s build something great together!
Method 1: The Quickest Start (Using a CDN)
This is the perfect method if you want to experiment, build a quick prototype, or just learn the basics. It involves adding a single line to your HTML file.
Step-by-Step:
Create Your Project Folder
Create a new folder on your computer for your project. Name it something likemy-bulma-site.Create Your HTML File
Inside this folder, create a new file and name itindex.html. Open it in your favorite text editor (like VS Code, Sublime Text, or even Notepad).Start with Basic HTML
Copy and paste this standard HTML boilerplate into yourindex.htmlfile:
					<!DOCTYPE html>
<html lang="en">
<head>
    <meta charset="UTF-8">
    <meta name="viewport" content="width=device-width, initial-scale=1.0">
    <title>My First Bulma Website</title>
</head>
<body>
    <h1>Hello, World! This is plain HTML.</h1>
<script>var rocket_lcp_data = {"ajax_url":"https:\/\/codersship.com\/wp-admin\/admin-ajax.php","nonce":"73db08ced0","url":"https:\/\/codersship.com\/bulma\/setting-up-a-bulma-project","is_mobile":false,"elements":"img, video, picture, p, main, div, li, svg","width_threshold":1600,"height_threshold":700,"debug":null}</script><script data-name="wpr-lcp-beacon" src='https://codersship.com/wp-content/plugins/wp-rocket/assets/js/lcp-beacon.min.js' async></script></body>
</html>
4. Add the Bulma Magic
Now, inside the <head> section, right before the </head> tag, add the link to the Bulma CSS file from the CDN (Content Delivery Network).
					<head>
    <meta charset="UTF-8">
    <meta name="viewport" content="width=device-width, initial-scale=1.0">
    <title>My First Bulma Website</title>
    <!-- Add this line to include Bulma -->
    <link data-minify="1" rel="stylesheet" href="https://codersship.com/wp-content/cache/min/1/npm/bulma@1.0.0/css/bulma.min.css?ver=1767430493">
</head>
5. Test It Out!
Save your file and open index.html in a web browser. You won’t see a dramatic change yet because we haven’t used any Bulma classes. Let’s fix that.
Replace the code inside your <body> tags with this:
					<section class="section">
    <div class="container">
        <h1 class="title is-1 has-text-primary">Wow, I'm Styled!</h1>
        <p class="subtitle">This is so much better than plain HTML.</p>
        <button class="button is-success is-large">A Fancy Button</button>
    </div>
</section>
Save and refresh your browser. You should now see a nicely centered layout with a large, colored title and a big green button!
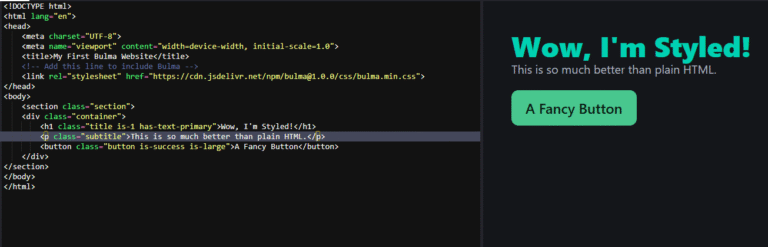
What just happened? We used Bulma’s classes like title, button, and is-success to style our page. The section and container classes provide spacing and centering. It’s that simple!
Method 2: The Developer Setup (Using NPM)
If you’re planning a larger project and want more control (like changing Bulma’s default colors), this method is for you. It requires Node.js, which you can download for free from nodejs.org.
Step-by-Step:
Create a Project Folder and Initialize
Open your terminal or command prompt. Navigate to where you want your project and type:
					# Create the folder and enter it
mkdir my-advanced-bulma-site
cd my-advanced-bulma-site

# Create a package.json file (press enter through any prompts)
npm init -y
2. Install Bulma
In the same terminal, run:
npm install bulma
This downloads Bulma into a node_modules folder.
3. Create Your Source Files
In your project folder, create two new folders and files so your structure looks like this:
					my-advanced-bulma-site/
├── node_modules/ (created by npm)
├── src/
│   ├── styles.scss # Your main styles file
│   └── index.html  # Your HTML file
├── package.json
4. Set Up Your Custom Styles
Open src/styles.scss in your editor. This is where the real power is. You can now import Bulma and even customize it.
					// 1. Change the default theme if you want!
$primary: #8A2BE2; // A custom purple color

// 2. Import the entire Bulma framework
@import '../node_modules/bulma/bulma.sass';

// 3. Add your own custom CSS below
.my-custom-class {
  border: 2px dashed $primary;
}
5. Compile Your CSS
To convert the .scss file into a regular .css file that browsers can read, we need a SASS compiler. The easiest way is to install it globally via the terminal:
npm install -g sass
Then, run the compiler:
sass src/styles.scss dist/styles.css
This will create a
distfolder with your final, compiled CSS.
6. Link to Your Compiled CSS
In your src/index.html file, link to the CSS file you just generated in the dist folder.
					<!DOCTYPE html>
<html lang="en">
<head>
    <meta charset="UTF-8">
    <meta name="viewport" content="width=device-width, initial-scale=1.0">
    <title>My Custom Bulma Site</title>
    <link rel="stylesheet" href="../dist/styles.css">
</head>
<body>
    <section class="section">
        <div class="container">
            <h1 class="title">This is using my <span class="my-custom-class">custom color</span>!</h1>
            <!-- The button will now be your custom purple -->
            <button class="button is-primary">A Custom Button</button>
        </div>
    </section>
<script>var rocket_lcp_data = {"ajax_url":"https:\/\/codersship.com\/wp-admin\/admin-ajax.php","nonce":"73db08ced0","url":"https:\/\/codersship.com\/bulma\/setting-up-a-bulma-project","is_mobile":false,"elements":"img, video, picture, p, main, div, li, svg","width_threshold":1600,"height_threshold":700,"debug":null}</script><script data-name="wpr-lcp-beacon" src='https://codersship.com/wp-content/plugins/wp-rocket/assets/js/lcp-beacon.min.js' async></script></body>
</html>
Your Project Structure: A Quick Overview
No matter which method you choose, it’s helpful to know what you’re looking at.
					my-bulma-project/
├── src/
│   ├── index.html      # Your main HTML file
│   └── styles.scss     # Your main styles (for NPM method)
├── dist/
│   └── styles.css      # The final CSS (generated by SASS)
├── node_modules/       # All installed packages (for NPM method)
└── package.json        # Project configuration (for NPM method)
What to Do Next?
Congratulations! You’ve set up a Bulma project. The fun is just beginning.
Explore the Documentation: The Official Bulma Documentation is your best friend. It’s incredibly clear and has examples for every component.
Start Building: Try creating a navbar, a hero section, or a grid of cards. Just copy the code from the docs and paste it into your HTML!
Practice with Classes: The core of Bulma is its class system. Remember:
buttonmakes an element look like a button, andis-primarychanges its color.